- 按照Lete乐特的教程添加了哔哩哔哩banner,用以替换原始顶图(Top image)
这导致banner图不适应暗黑模式,问题就是如何将banner所在div调暗,现有两种解决方案(我采取第二种):- 通过亮度滤镜实现实测发现,每当从暗黑模式进入新的页面,顶图变暗都有一个很大的延迟,我没有找出具体的原因,因此想了另一个解决方案,通过伪元素实现(黑色透明蒙板)遮罩层:
1
2
3[data-theme="dark"] #page-header {
filter: brightness(60%);
} - 通过伪元素实现
1
2
3
4
5
6
7
8
9
10[data-theme="dark"] #page-header::before {
content:'';
display:block;
position:relative;
width:100%;
height:100%;
z-index:7;
background-color:#121212;
opacity:0.7;
}
- 通过亮度滤镜实现
- 之前看到黑石博客首页文章卡片有模糊背景,很漂亮,我也来实现一下吧
首先看一个实现该效果的简单示例:简单来说就是将父div设为relative,然后额外添加一个子div充当blur层并设为absolute,在blur层上设置背景并进行高斯模糊,最后将你要显示在blur层之上的东西都放在blur层后面即可1
2
3
4
5
6
7
8
9
10
11
12
13
14
15
16
17
18
19
20
21
22
23
24
25
26
27
28
29
30
31
32
33<html>
<style type="text/css">
.wrapper{
position: relative;
width:500px;
height:400px;
}
.blur_layer{
position: absolute;
width:100%;
height:100%;
filter: blur(8px);
background:url(https://cdn.statically.io/gh/celestezj/ImageHosting/master/img/20210217120300.jpg);
background-size: cover;
opacity: 0.5;
}
.content{
position:absolute;
left: 50%;
top: 50%;
transform: translate(-50%);
}
</style>
<div class="wrapper">
<div class="blur_layer"></div>
<div class="content">
Hello, World!<!-- 这里放置你的内容 -->
</div>
</div>
</html>
好了,思路有了,现在改源码,打开目标文件butterfly/layout/includes/mixins/post-ui.pug,在if post_cover && theme.cover.index_enable一行下面添加如下内容:这个1
2
3
4
5.dyblurbg
if theme.lazyload.enable
img(data-lazy-src=url_for(post_cover) onerror=`this.onerror=null;this.src='`+ url_for(theme.error_img.post_page) + `'` alt=title)
else
img(src=url_for(post_cover)).dyblurbg就是充当blur层的div,类名叫做dyblurbg,为了适配主题源码,还需要增加是否图片懒加载的判断,具体参见vanilla-lazyload
新建butterfly/source/css/mystyle.css文件:其中1
2
3
4
5
6
7
8
9
10
11
12
13
14
15
16
17.dyblurbg {
position: absolute;
width: 100%;
height: 100%;
filter: blur(15px);
opacity: 0.5;
}
.dyblurbg img {
width: 100%;
height: 100%;
}
.recent-post-item{
position: relative;
overflow: hidden;
}recent-post-item就是dyblurbg的父div,最后在主题配置的inject项中引入该css文件即可:1
2
3inject:
head:
- <link rel="stylesheet" href="/css/mystyle.css">解决不了问题那就消除问题好了,在移动端,我直接将blur层给置为经过测试,在PC端、手机端各浏览器都工作正常,唯独在iPad设备中背景模糊特效图片会时不时发生闪烁且残缺不全的状况,暂时无力解决,慎用
none了😅1
2
3
4
5@media only screen and (max-width: 1500px){
.dyblurbg {
display: none;
}
} - 之前在Volantis主题中根据参考文章增加了文章日历图,稍稍改一点应用到Butterfly主题下
- 将下载下来的源码文件(post-calendar.pug)粘贴到themes/butterfly/layout/includes/目录下
- 在themes/butterfly/source/css/mystyle.css中添加样式:
1
2
3
4
5
6
7#post-calendar {
height: 225px;
width: 100%;
margin-top: 20px;
border-radius: 12px;
background:rgba(255,255,255,0);
} - 在themes/butterfly/layout/archive.pug中引入post-calendar.pug,在
#archive位置下插入一行:include includes/post-calendar,注意空格,如下:1
2
3
4
5...
#archive
include includes/post-calendar
.article-sort-title= _p('page.articles') + ' - ' + site.posts.length
... - 在主题配置文件(_config.butterfly.yml)中
inject项中引入依赖文件:1
2
3
4
5
6
7inject:
head:
...
- <link rel="stylesheet" href="/css/mystyle.css">
- <script src="http://cdn.staticfile.org/moment.js/2.24.0/moment.min.js"></script>
- <script src="https://cdn.statically.io/gh/InfiniteYinux/cloud/2.44/Hexo/themeConfig/echarts.min.js"></script>
...
https://celestezj.github.io/archives/ - 对相关文章的样式进行了修改(似乎比原来美观了那么一点点,或者还是丑陋~),目前只在电脑端体验
注:不需要修改主题源文件,只需要在butterfly/source/css/mystyle.css中添加即可1
2
3
4
5
6
7
8
9
10
11
12
13
14
15
16
17
18
19
20
21
22
23
24
25
26
27
28
29
30
31
32
33
34
35
36
37
38
39
40
41
42
43
44
45
46
47
48
49
50
51
52
53
54
55
56
57
58
59
60
61
62
63
64
65
66
67
68
69
70@media only screen and (min-width: 1500px){
.relatedPosts > .relatedPosts-list div {
background: #f6f6f6;
}
[data-theme="dark"] .relatedPosts{
background: #121212 ;
}
[data-theme="dark"] .relatedPosts > .relatedPosts-list div{
background: #121212 ;
}
.relatedPosts > .relatedPosts-list .cover {
height: 66%;
opacity: 0.8;
}
.relatedPosts > .relatedPosts-list .content {
top: 85% ;
}
.relatedPosts > .relatedPosts-list .content .title, .date {
color: #888888 ;
font-size: 0.82rem;
}
.relatedPosts > .relatedPosts-list .content .title {
color: #656261 ;
height: 50px;
display: block;
overflow:hidden;
white-space: nowrap;
text-overflow:ellipsis;
}
.relatedPosts > .relatedPosts-list .content .title:hover {
color: red ;
}
.relatedPosts {
background: #f6f6f6 ;
}
.relatedPosts > .relatedPosts-list {
width: 94% ;
margin: 0 auto;
height: 215px;
overflow: scroll;
}
.relatedPosts > .headline {
font-size: 1.1em;
margin-left: 3%;
padding-top: 14.5px;
}
[data-theme="dark"] .relatedPosts > .headline {
color: #b8b8b8;
}
::-webkit-scrollbar {
width: 5px;
}
::-webkit-scrollbar-corner {
background-color: #f6f6f6;
}
[data-theme="dark"] ::-webkit-scrollbar-corner {
background-color: #121212;
}
} - 为存档、分类、标签页面的文章列表中的头图添加大图预览
- 新建themes/butterfly/source/js/article_img_preview.js文件:
1
2
3
4
5
6
7
8
9
10
11
12
13
14
15
16
17
18
19
20
21
22
23
24
25
26this.imagePreview = function(){
xOffset = 10;
yOffset = 30;
$("a.article-sort-item-img").hover(function(e){
this.t = this.title;
var c = (this.t != "") ? "<br/>" + this.t : "";
$("body").append("<div id='article-img-preview'><img src='"+ $(this).find('img').attr('src') +"' alt='Article Image Preview' style='width:300px;' />"+ c +"</div>");
$("#article-img-preview")
.css("top",(e.pageY - xOffset) + "px")
.css("left",(e.pageX + yOffset) + "px")
.fadeIn("fast");
},
function(){
$("#article-img-preview").remove();
});
$("a.article-sort-item-img").mousemove(function(e){
$("#article-img-preview")
.css("top",(e.pageY - xOffset) + "px")
.css("left",(e.pageX + yOffset) + "px");
});
};
// starting the script on page load
$(document).ready(function(){
imagePreview();
}); - 在themes/butterfly/source/css/mystyle.css中添加预览图所在div样式:
1
2
3
4
5
6
7#article-img-preview{
position:absolute;
background:#333;
padding:5px;
display:none;
color:#fff;
} - 在主题配置文件的
inject项中引入上述脚本以及jQuery库:1
2
3
4
5
6inject:
head:
...
- <script src="https://cdn.staticfile.org/jquery/2.1.4/jquery.min.js"></script>
- <script src="/js/article_img_preview.js"></script>
...
考虑到大部分人都会在主题配置中启用pjax,下面给出(在上述基础上)适配pjax的修改版本使用pjax后,一些用户自定义的js脚本在页面跳转时可能需要重新调用,参见主题文档
将待执行的jquery代码用一个函数包裹起来,然后通过btf.isJqueryLoad(包裹函数)调用以避免多次加载jquery,参见主题文档- 删除主题配置
inject项中jquery.min.js的引用 - 替换themes/butterfly/source/js/article_img_preview.js文件:下载
- 修改themes/butterfly/layout/includes/layout.pug文件,在最后一行添加(注意空格,script打头空两格):
1
2script(data-pjax).
btf.isJqueryLoad(image_preview_wrapper);
- 新建themes/butterfly/source/js/article_img_preview.js文件:
- 发现一款有意思的“随机文章”插件,不过正如作者所说,插件目前存在一个bug,当用于其他主题(非Sakura主题)时可能将无关页面载入随机文章列表。为了正确引入该功能,我给出两种方案
- 按照原插件的思路,生成一个random.html页面,页面脚本存储着可供随机选择的全部文章列表,当访问该页面时候,浏览器自动跳转到某一随机文章页面,具体代码效仿404.html页面的生成:
- 新建themes/butterfly/layout/random.pug文件:
1
2
3
4
5
6
7
8
9
10
11
12
13
14
15
16doctype html
html(lang=config.language data-theme=theme.display_mode)
head
body(onload="javascript:dogo();")
- let random_articles = []
- site.posts.each(function (article) {
- let if_random = article.random == true || article.random == false ? article.random : theme.random_article
- if (if_random) random_articles.push(url_for(article.path))
- })
script.
function dogo(){
var urls="#{random_articles}";
urls=urls.split(",");
n = Math.floor(Math.random()*urls.length);
location.href= urls[n];
}; - 新建themes/butterfly/scripts/events/random.js文件:
1
2
3
4
5
6
7
8
9
10
11
12
13
14/**
* Butterfly
* random article page
*/
hexo.extend.generator.register('random', function (locals) {
return {
path: 'random/index.html',
data: locals.posts,
layout: ['random']
}
}) - 在导航栏添加随机文章超链接,地址指向/random/,编辑主题配置文件:
1
2
3
4menu:
. . .
随便看看: /random/ || fas fa-layer-group faa-tada
. . . - 最后在主题配置文件中新增配置:表示默认将所有post文章都添加到随机列表,你可以在post的front-matter中覆盖此配置,譬如:
1
random_article: true
这意味着当前post文章不会被添加到随机列表中1
2
3
4
5---
. . .
random: false
. . .
---
- 新建themes/butterfly/layout/random.pug文件:
- 不借助random.html页面,直接将随机跳转脚本写在layout.pug模板中(如果你启用了pjax,建议使用此方法):
- 新建themes/butterfly/layout/includes/random-js.pug文件:
1
2
3
4
5
6
7
8
9
10
11
12- let random_articles = []
- site.posts.each(function (article) {
- let if_random = article.random == true || article.random == false ? article.random : theme.random_article
- if (if_random) random_articles.push(url_for(article.path))
- })
script.
function dogo(){
var urls="#{random_articles}";
urls=urls.split(",");
n = Math.floor(Math.random()*urls.length);
pjax.loadUrl(urls[n]);
}; - 编辑themes/butterfly/layout/includes/layout.pug文件,在
include ./additional-js.pug下一行添加即可:1
2include ./additional-js.pug
+ include ./random-js.pug - 编辑主题配置文件,在导航栏添加随机文章超链接:原本只有一个
1
2
3
4
5menu:
. . .
友链: /link/ || fas fa-link ||
随便看看: javascript:void(0); || fas fa-layer-group faa-tada || dogo()
. . .||间隔,左边表示链接地址,右边为图标标识,修改后,有两个||间隔,左边为链接,中间为标识,右边为onclick属性值,为此修改themes/butterfly/layout/includes/header/menu_item.pug文件:还有一处:1
2
3
4. . .
- a.site-page(href=url_for(trim(value.split('||')[0])))
+ a.site-page(href=url_for(trim(value.split('||')[0])),onclick=trim(value.split('||')[2]))
. . .1
2
3
4. . .
- a.site-page.child.faa-parent.animated-hover(href=url_for(trim(val.split('||')[0])))
+ a.site-page.child.faa-parent.animated-hover(href=url_for(trim(val.split('||')[0])),onclick=trim(val.split('||')[2]))
. . . - 最后仍需在主题配置文件中新增配置(同样可以在front-matter中覆盖):
1
random_article: true
- 新建themes/butterfly/layout/includes/random-js.pug文件:
- 按照原插件的思路,生成一个random.html页面,页面脚本存储着可供随机选择的全部文章列表,当访问该页面时候,浏览器自动跳转到某一随机文章页面,具体代码效仿404.html页面的生成:
- 添加春节灯笼,灯笼样式来自博主itsNeko,步骤如下:
- 编辑主题配置文件,引入样式文件:
1
2
3
4
5inject:
head:
. . .
- <link rel="stylesheet" href="https://cdn.statically.io/gh/celestezj/Mirror1ImageHosting/master/data/denglong/denglong.css">
. . . - 编辑themes/butterfly/layout/includes/layout.pug,在页面中添加灯笼
<div>标签:1
2
3
4
5
6
7
8
9
10
11
12
13
14
15
16
17
18
19
20
21
22
23body
. . .
if theme.denglong
.denglong
.deng-box
.deng
.xian
.deng-a
.deng-b
.deng-t 喜迎
.shui.shui-a
.shui-c
.shui-b
.deng-box1
.deng
.xian
.deng-a
.deng-b
.deng-t 春节
.shui.shui-a
.shui-c
.shui-b
. . . - 再次编辑主题配置文件,引入开关:执行
1
denglong: true
hexo g、hexo s就可以看到位于网站左上角的灯笼了
- 编辑主题配置文件,引入样式文件:
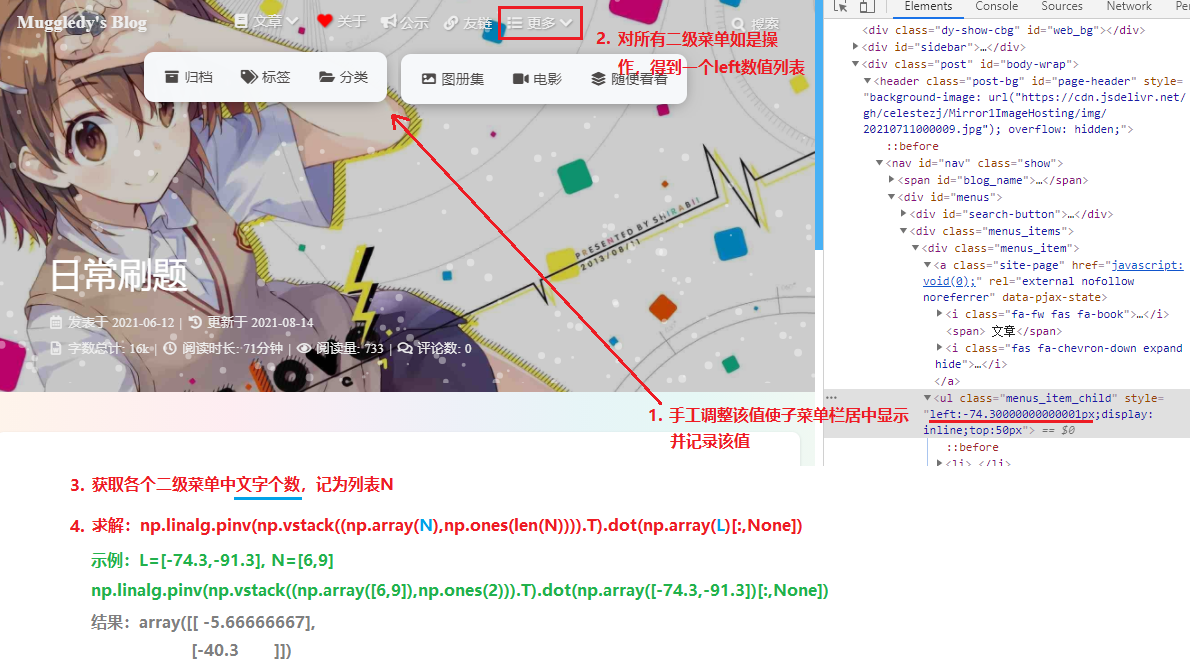
- 参考糖果屋Akilar和Hassan,修改顶栏菜单样式
- 在themes/butterfly/source/css/mystyle.css中新增样式:
1
2
3
4
5
6
7
8
9
10
11
12
13
14
15
16
17
18
19
20
21
22
23
24/*顶部菜单栏居中*/
#nav .menus_items {
display: flex;
justify-content: center;
position: absolute;
width: 500px;
left: 0;
right: 0;
top: 10px;
margin: auto;
}
/* 横向排布子菜单 */
#nav .menus_items .menus_item .menus_item_child li {
display: inline-block;
}
/* 圆角隐藏 */
#nav ul.menus_item_child {
overflow: hidden;
border-radius: 5px;
}
/* 调整空隙,确保不会天下武功唯快不破 */
#nav .menus_items .menus_item .menus_item_child {
margin-top: 0px ;
} - 修改themes/butterfly/layout/includes/header/menu_item.pug:注意,稍稍不同于Akilar的计算方式
1
2- ul.menus_item_child
+ ul.menus_item_child(style=`left:`+ (-5.6 * Object.keys(value).join("").length - 40.3) + `px;`)x * Object.keys(value).length + y,譬如我有两个二级菜单,每个都有三项,这种方式计算的left偏移值应该是相同的,但是我这两个二级菜单宽度并不一样啊,所以替换为x * Object.keys(value).join("").length + y更合理
- 在themes/butterfly/source/css/mystyle.css中新增样式:
- Plotly是一个基于d3.js与stack.gl的图形库,它可以用来绘制各种类型的图表,比如散点图、折线图、饼图、柱状图甚至3D图形等,与butterfly主题的集成可以参考这篇Plotly & Hugo
- 绘制三维散点图的python示例代码如下:
1
2
3
4
5
6
7
8
9
10
11
12
13
14
15
16
17
18
19
20
21
22
23
24
25
26
27import plotly.graph_objects as go
from plotly.graph_objs import Layout
import numpy as np
# Generate sample data
np.random.seed(42)
x = np.random.rand(100)
y = np.random.rand(100)
z = np.random.rand(100)
# Create a 3D scatter plot
layout = Layout(
paper_bgcolor='black', #设置黑色背景
plot_bgcolor='rgba(0,0,0,0)'
)
fig = go.Figure(data=[go.Scatter3d(x=x, y=y, z=z, mode='markers', marker=dict(size=8, color=z, colorscale='Viridis'))], layout=layout)
# Add title and labels
fig.update_layout(scene=dict(xaxis_title='X-axis', yaxis_title='Y-axis', zaxis_title='Z-axis',
xaxis=dict(backgroundcolor='rgba(0,0,0,0)',gridcolor='rgba(173, 216, 230, 0.8)',color='white'),
yaxis=dict(backgroundcolor='rgba(0,0,0,0)',gridcolor='rgba(173, 216, 230, 0.8)',color='white'),
zaxis=dict(backgroundcolor='rgba(0,0,0,0)',gridcolor='rgba(173, 216, 230, 0.8)',color='white'))) #设置坐标轴背景颜色为透明
# 取消图像和边框之间的 margin
fig.update_layout(margin=dict(l=0, r=0, t=0, b=0))
# Show the plot
fig.show()
from plotly.io import write_image
#... Generate the fig here.
fig.write_json("plotly_demo.json") - 通过HTML+JS读取步骤一保存的json图像数据文件并显示:这里涉及到跨域问题,浏览器不允许使用file协议访问plotly_demo.json,会报错:“Access to XMLHttpRequest at ‘file:///C:/Users/muggledy/Downloads/plotly_demo.json’ from origin ‘null’ has been blocked by CORS policy: Cross origin requests are only supported for protocol schemes: http, data, isolated-app, chrome-extension, chrome, https”,于是使用anywhere将本地目录变成一个静态文件服务器的根目录:
1
2
3
4
5
6
7
8
9
10
11
12
13<html>
<head>
<script src="https://cdn.plot.ly/plotly-latest.min.js"></script>
</head>
<body>
<div id="demo1" class="plotly" style="height:600px"></div>
<script>
Plotly.d3.json('http://192.168.0.103:8080/plotly_demo.json', function(err, fig) {
Plotly.plot('demo1', fig.data, fig.layout, {responsive: true});
});
</script>
</body>
</html>1
2C:\Users\muggledy\Downloads> npm install anywhere -g
C:\Users\muggledy\Downloads> anywhere -p 8080 - 现在让我们将其集成到butterfly主题中,首先将plotly.js cdn链接放在_config.butterfly.yml配置文件中:要启用plotly绘图,需要在文章front-matter头部添加
1
2
3CDN:
# plotly.js
plotly_js: https://cdn.plot.ly/plotly-latest.min.jsplotly:enable来引入上述plotly.js,我们在butterfly/layout/includes/head.pug中加以控制:最后编写标签插件简化书写:1
2if page.plotly
script(src=url_for(theme.CDN.plotly_js))1
2
3
4
5
6
7
8
9
10
11
12
13
14
15
16
17
18
19
20
21
22
23
24
25
26
27
28;
function plotly(args) {
args = args.join(' ').split(', ')
let id = args[0].trim();
let json_url = args[1].trim();
let style = '';
if (args.length > 2) {
for (let i = 2; i < args.length; i++) {
let tmp = args[i].trim();
if (tmp.includes('height=')) {
style += 'height:' + tmp.substring(7, tmp.length) + ';';
}
}
}
if (!style.includes('height:')) {
style += 'height:400px;';
}
return `<div id="${id}" class="plotly" style="${style}"></div>
<script>
Plotly.d3.json("${json_url}", function(err, fig) {
Plotly.plot("${id}", fig.data, fig.layout, {responsive: true});
});
</script>`;
}
// {% plotly id, json_url[, height=400px] %}
hexo.extend.tag.register('plotly', plotly); - 示例,
{% plotly plotly_demo1, http://192.168.0.103:8080/plotly_demo.json[, height=400px] %}:
- 绘制三维散点图的python示例代码如下:
评论
ValineGitalk